Retailers are constantly looking for new ways to generate revenue and stay competitive. One strategy …

![]()
Cloud-native POS platform for seamless omnichannel customer experience.
![]()
A single hub for all promotions campaigns.
![]()
The most advanced synchronization solution for databases and file systems.
![]()
Data configuration and batch automation across different disparate systems and vendors.
Retailers are constantly looking for new ways to generate revenue and stay competitive. One strategy …

Clienteling isn’t a new theory. It can be traced back hundreds of years when shopkeepers …

BOPIS, BORIS, and Curbside Pickup offer consumers and retailers the best of both worlds. …
The SymmetricDS product can synchronize data between over forty different database platforms with out of …

Compare and Repair for SymmetricDS Pro can compare two databases, report on the differences, and …
Mobile replication with Android edge devices in near real time to an on-premise or cloud …

Jumpmind President and CEO Joe Corbin to Lead Panel on Agility at Scale and Digitalizing …

Retail Technology Leader Jumpmind Brings Newfound Interactive and Personalized Digital Engagement to Inspire Shoppers at …

Retail Technology Leader Jumpmind Provides Enhanced Experiential Point of Sale and In-Store Engagement for Build-A-Bear Workshop …
![]()
Cloud-native POS platform for seamless omnichannel customer experience.
![]()
A single hub for all promotions campaigns.
![]()
The most advanced synchronization solution for databases and file systems.
![]()
Data configuration and batch automation across different disparate systems and vendors.

This is the second part of a series on synchronizing Android SQLite databases using SymmetricDS. The last article talked about how to embed the SymmetricDS Android client into an Android application. This article will provide an overview of the central server and how it can be configured to synchronize the sample Notepad database.

Lets go ahead and setup the SymmetricDS server. Download the latest version of SymmetricDS Pro from the SymmetricDS downloads page.
The download is a jar installer. In most cases double clicking on the jar file will launch the installer. If the jar file type is not associated with Java on your system then you might need to launch the installer using the following command:
java -jar symmetric-pro-X.X.X-setup.jar
Walk through the install process. At the end of the setup, you’ll have SymmetricDS installed on your system. Choose to open up the SymmetricDS Pro Control Center.
To run the server, if it is not already running, click the Start Server button. Once it is running, click Open Web Console.
Lets now set up the Master Node in SymmetricDS through the Node Setup screen. Choose your database and enter the username and password. For this example, I will use an H2 database. Choose the Standard 2 Tier Configuration and click Next. For this example, the default Sync Url should be sufficient.
Now we need to create our NOTES table in SymmetricDS. Navigate to the Explore tab and paste the following SQL:
CREATE TABLE NOTES ( _ID VARCHAR(50) PRIMARY KEY, TITLE TEXT, NOTE TEXT, CREATED VARCHAR(50), MODIFIED VARCHAR(50), );
Run this as a script.
Now it is time to set up your trigger. Navigate to Configure->Table Triggers. Click Auto Create… Choose the default Channel and select the NOTES table we created earlier. Highlight the new trigger and click Link. Choose the direction(s) you wish to link SymmetricDS and your Android Device. For this example, I will link it both ways to enable synchronization in both directions. Save your choice(s).
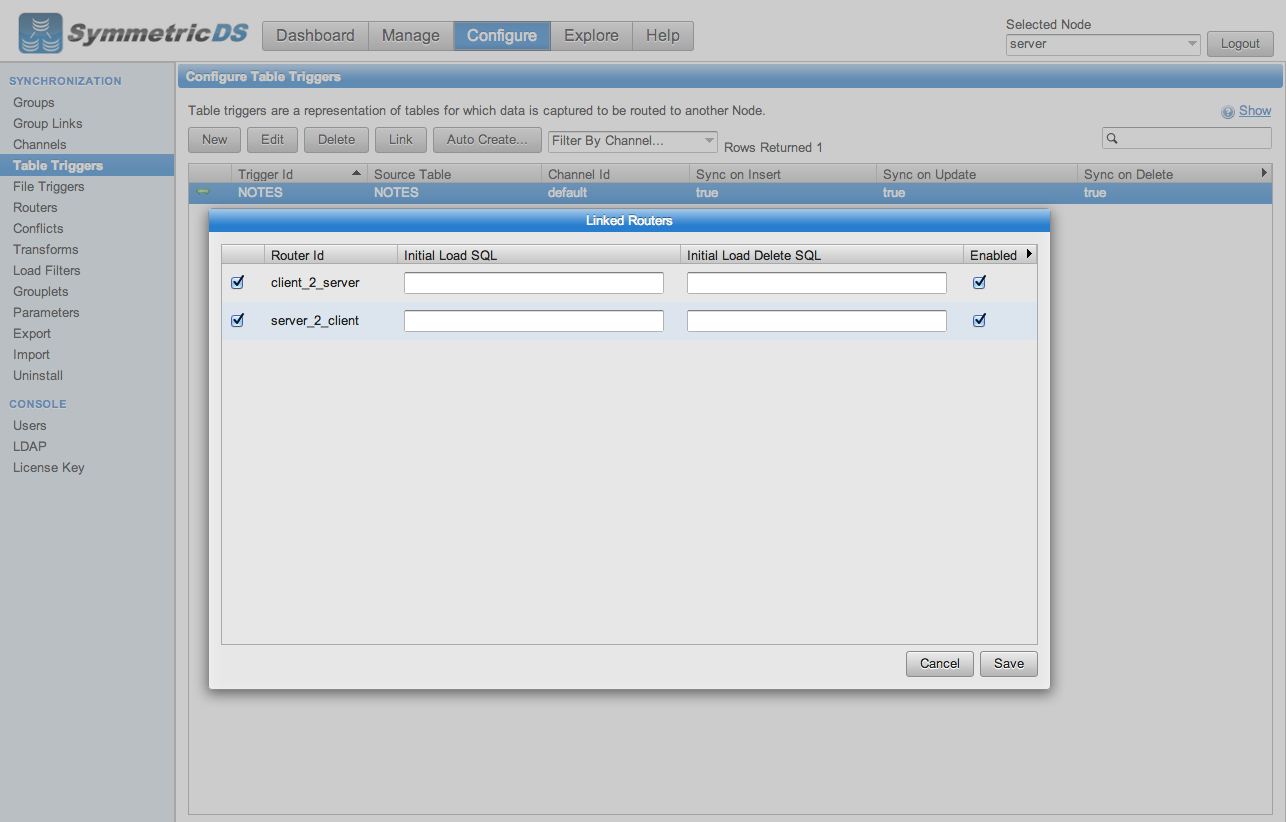
Configuring the Table Trigger
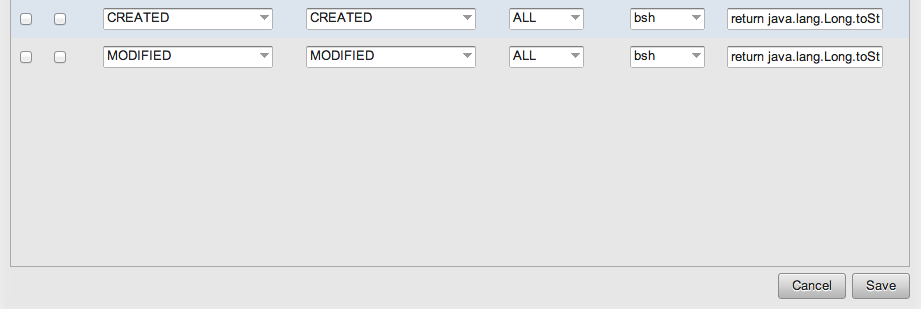
We need to create Transforms for our CREATED and MODIFIED Columns. This is because these fields need to be converted into SQL timestamps. First, lets set up our NOTES_INBOUND transform. Copy the information from the picture below.
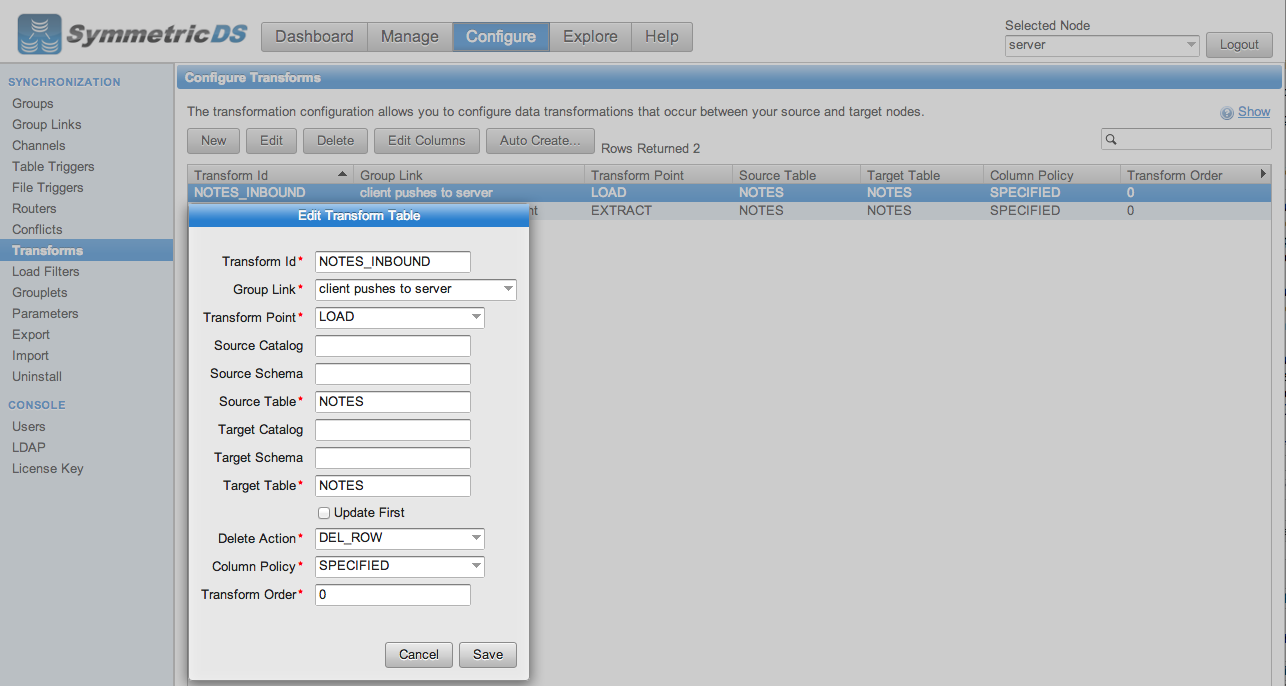
Configuring the NOTES_INBOUND Transform
Double click the NOTES_INBOUND transform. Create Columns for _ID, TITLE, and NOTE like the picture below.
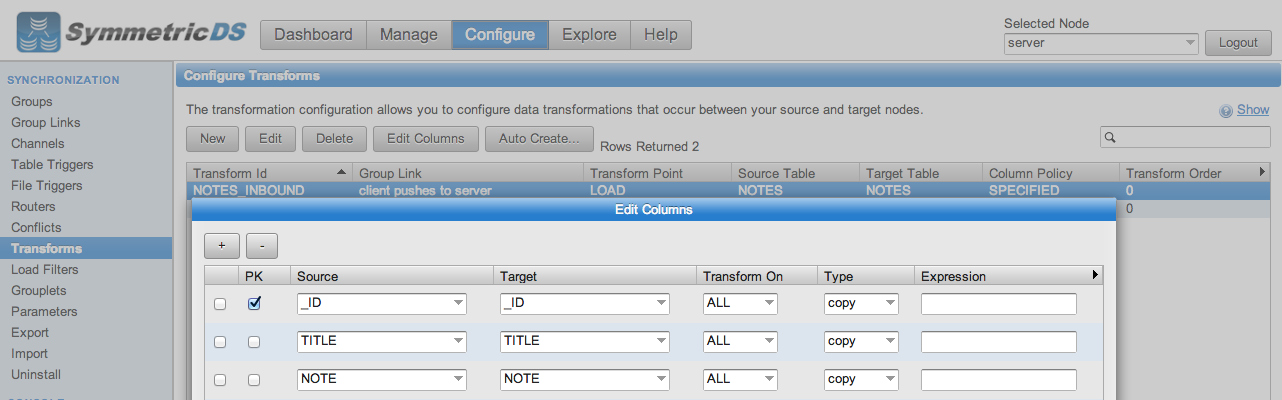
Creating _ID, TITLE, and NOTE Columns in NOTES_INBOUND
Create Columns for CREATED and MODIFIED. Both the CREATED and MODIFIED transforms require a bsh script as their Type.
![]()
Creating CREATED and MODIFIED Columns in NOTES_INBOUND
For CREATED, enter the following script as your Expression:
return new java.sql.Timestamp(java.lang.Long.parseLong(CREATED)).toString();
For MODIFIED, enter the following script as your Expression:
return new java.sql.Timestamp(java.lang.Long.parseLong(MODIFIED)).toString();
Next, lets set up our NOTES_OUTBOUND transform. Again, copy the information from the picture below.
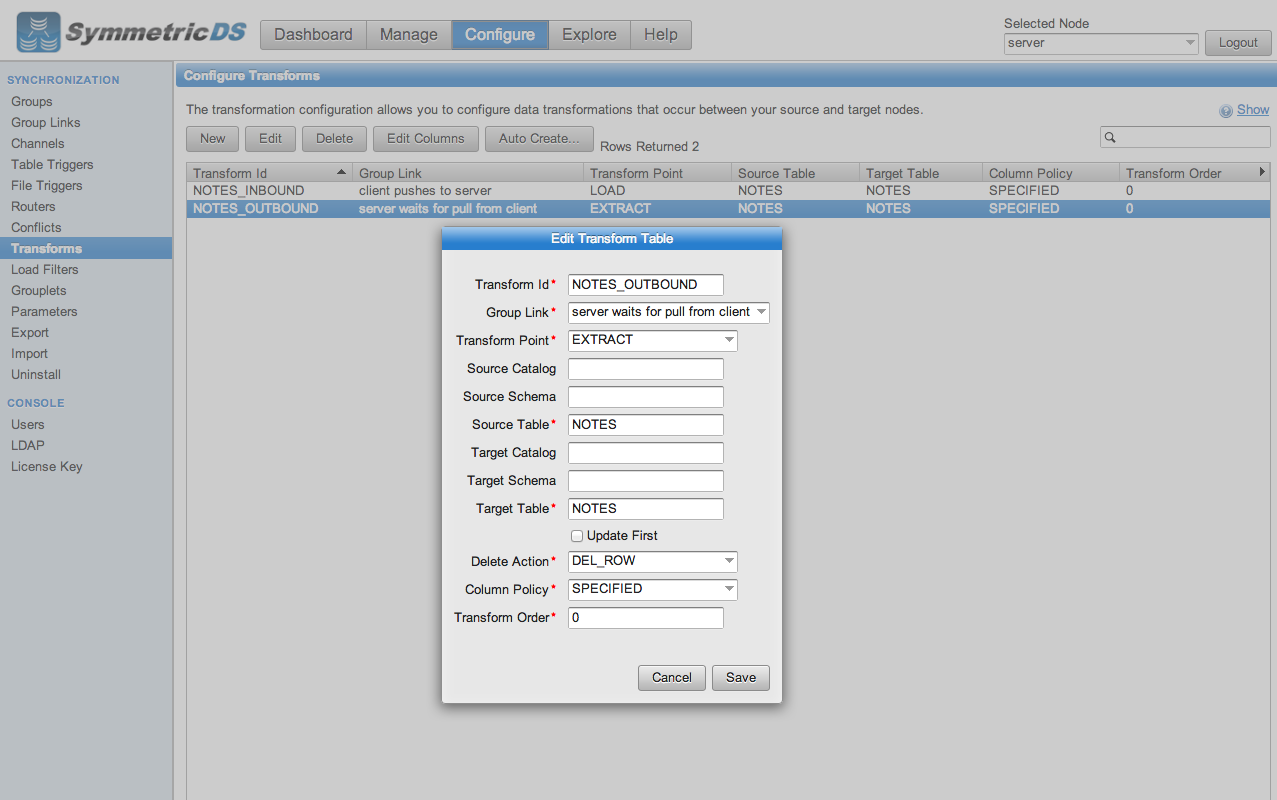
Configuring the NOTES_OUTBOUND Transform
Double click the NOTES_OUTBOUND transform. Create Columns for _ID, TITLE, and NOTE like the picture below.
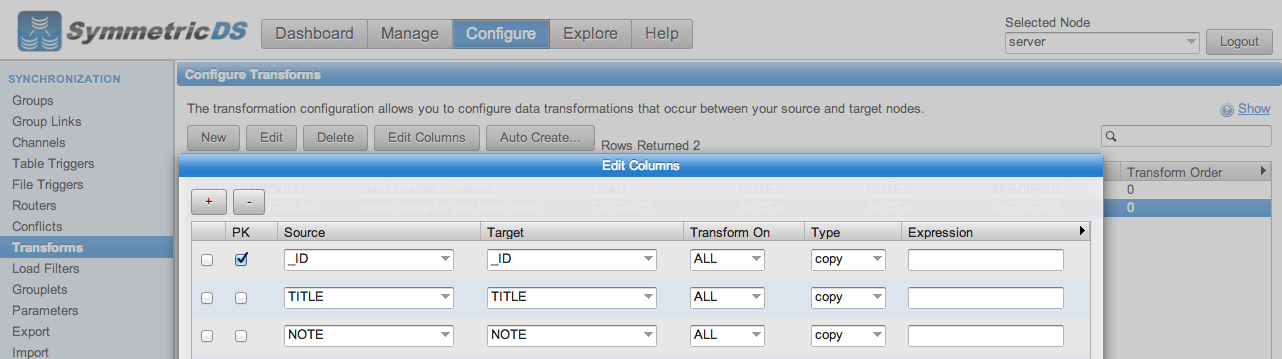
Creating _ID, TITLE, and NOTE Columns in NOTES_OUTBOUND
Create Columns for CREATED and MODIFIED. Both the CREATED and MODIFIED transforms require a bsh script as their Type.
Creating CREATED and MODIFIED Columns in NOTES_OUTBOUND
For CREATED, enter the following script as your Expression:
return java.lang.Long.toString(new java.text.SimpleDateFormat(“yyyy-MM-dd:hh:mm:ss.S”).parse(CREATED).getTime());
For MODIFIED, enter the following script as your Expression:
return java.lang.Long.toString(new java.text.SimpleDateFormat(“yyyy-MM-dd:hh:mm:ss.S”).parse(MODIFIED).getTime());
Go back to Eclipse. We need to set up an Android Emulator. This can be done by opening the Android Virtual Device Manager. Click New and follow the steps. The higher the Emulator’s API, the better.
Run your NotePad project by pressing Run on NotePadProvider.java in Eclipse. When prompted, select the emulator you just created. Monitor the Console in Eclipse. Let the NotePad.apk install on the emulator. Now watch the LogCat and wait as it attempts to register with your SymmetricDS Master Node.
Go back to SymmetricDS and navigate to Manage->Nodes. Right-click the android-simulator registration request and click Allow. Check the Send Initial Load box and Apply.
Go back to your Android Emulator and create a new note. When you are done, save the note.
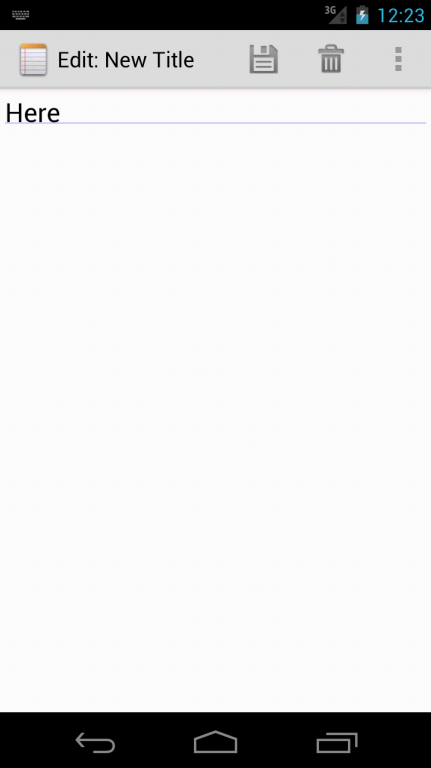
Creating a note in the Android Emulator
Go back to SymmetricDS and navigate to the Explore tab. Enter the following SQL:
SELECT * FROM NOTES;
Run this as sql under cursor. The note you created in your Android Emulator should now show up in SymmetricDS as the result.
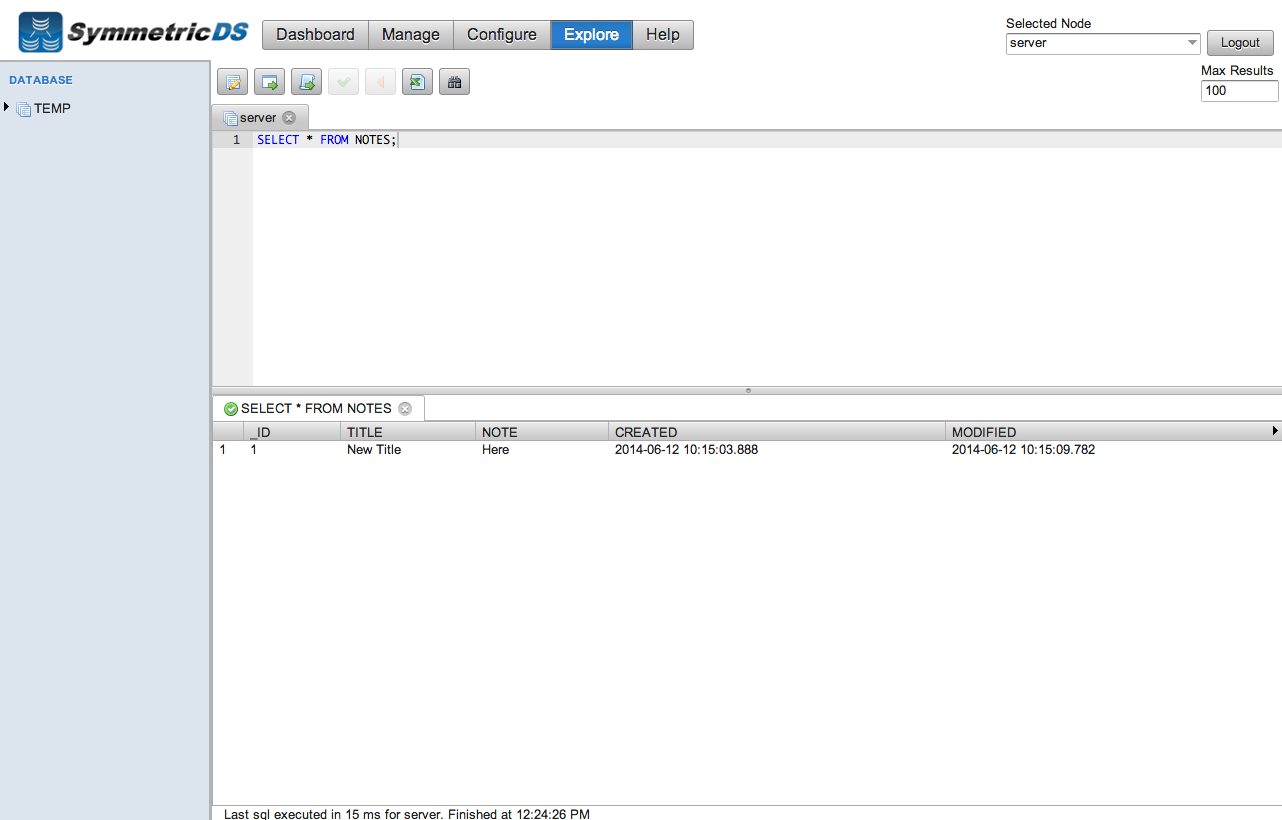
SELECT * FROM NOTES Result
Additional Tips: To support multiple NotePad clients, add column to the NOTES table by entering the following SQL:
ALTER TABLE NOTES ADD SOURCE_ID INTEGER;
Now, go back to your transforms and double-click on NOTES_INBOUND. Create a Column like the one below.
![]()
Creating SOURCE_ID Column in NOTES_OUTBOUND
Save your changes.
Congratulations! You have now synchronized your Android Device with SymmetricDS.