Retailers are constantly looking for new ways to generate revenue and stay competitive. One strategy …

![]()
Cloud-native POS platform for seamless omnichannel customer experience.
![]()
A single hub for all promotions campaigns.
![]()
The most advanced synchronization solution for databases and file systems.
![]()
Data configuration and batch automation across different disparate systems and vendors.
Retailers are constantly looking for new ways to generate revenue and stay competitive. One strategy …

Clienteling isn’t a new theory. It can be traced back hundreds of years when shopkeepers …

BOPIS, BORIS, and Curbside Pickup offer consumers and retailers the best of both worlds. …
The SymmetricDS product can synchronize data between over forty different database platforms with out of …

Compare and Repair for SymmetricDS Pro can compare two databases, report on the differences, and …
Mobile replication with Android edge devices in near real time to an on-premise or cloud …

Jumpmind President and CEO Joe Corbin to Lead Panel on Agility at Scale and Digitalizing …

Retail Technology Leader Jumpmind Brings Newfound Interactive and Personalized Digital Engagement to Inspire Shoppers at …
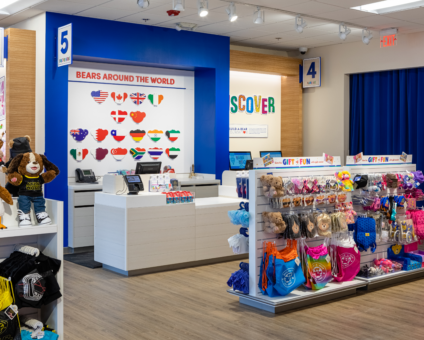
Retail Technology Leader Jumpmind Provides Enhanced Experiential Point of Sale and In-Store Engagement for Build-A-Bear Workshop …
![]()
Cloud-native POS platform for seamless omnichannel customer experience.
![]()
A single hub for all promotions campaigns.
![]()
The most advanced synchronization solution for databases and file systems.
![]()
Data configuration and batch automation across different disparate systems and vendors.

Metl includes a prepackaged component library for everyday use but some users may require unique functionality. This can easily be achieved with custom components. In this article I will walk through the steps required to create your own custom Metl component
Metl is an open source, lightweight, web based integration tool that supports the creation of custom components. Metl comes with a large set of prepackaged components, however, if a unique need arises, custom components can be created to implement specialized needs. Building custom components is very straight forward. The basic steps are as follows:
This will describe the steps required to create a custom component that uses Pushover, a cross platform notification application capable of varying levels of priority. The goal of this component was to integrate with our support center platform to send an emergency notification in the result of a missed support call. The flow utilized several standard Metl components but this will focus on the development steps for the custom Pushover component.
The Metl engine and its prepackaged projects are built in Java. To create the custom component, first create a new Java project to hold the source code and related files. The project needs a dependency on the metl-core library which is available from the JumpMind maven repository here. The project structure for this custom component is shown below.
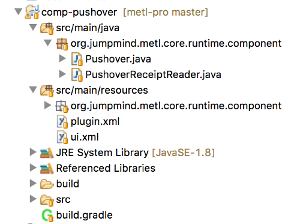
The project requires the following parts:
The component definition is created by writing a file called plugin.xml. This xml file needs to conform to the components.xsd file which can be found here. This file determines parameters such as the component name, and component settings. The basic component definition is defined as such:
<component category='PROCESSOR'
             id='Pushover'
             inputMessageType='any'
             inputOutputModelsMatch='false'
             outputMessageType='any'
             supportsMultipleThreads='false'
             resourceCategory='none'>
    <name>Pushover Message</name>
    <className>org.jumpmind.metl.core.runtime.component.Pushover</className>
    <keywords>message,notification</keywords>
    <description></description>
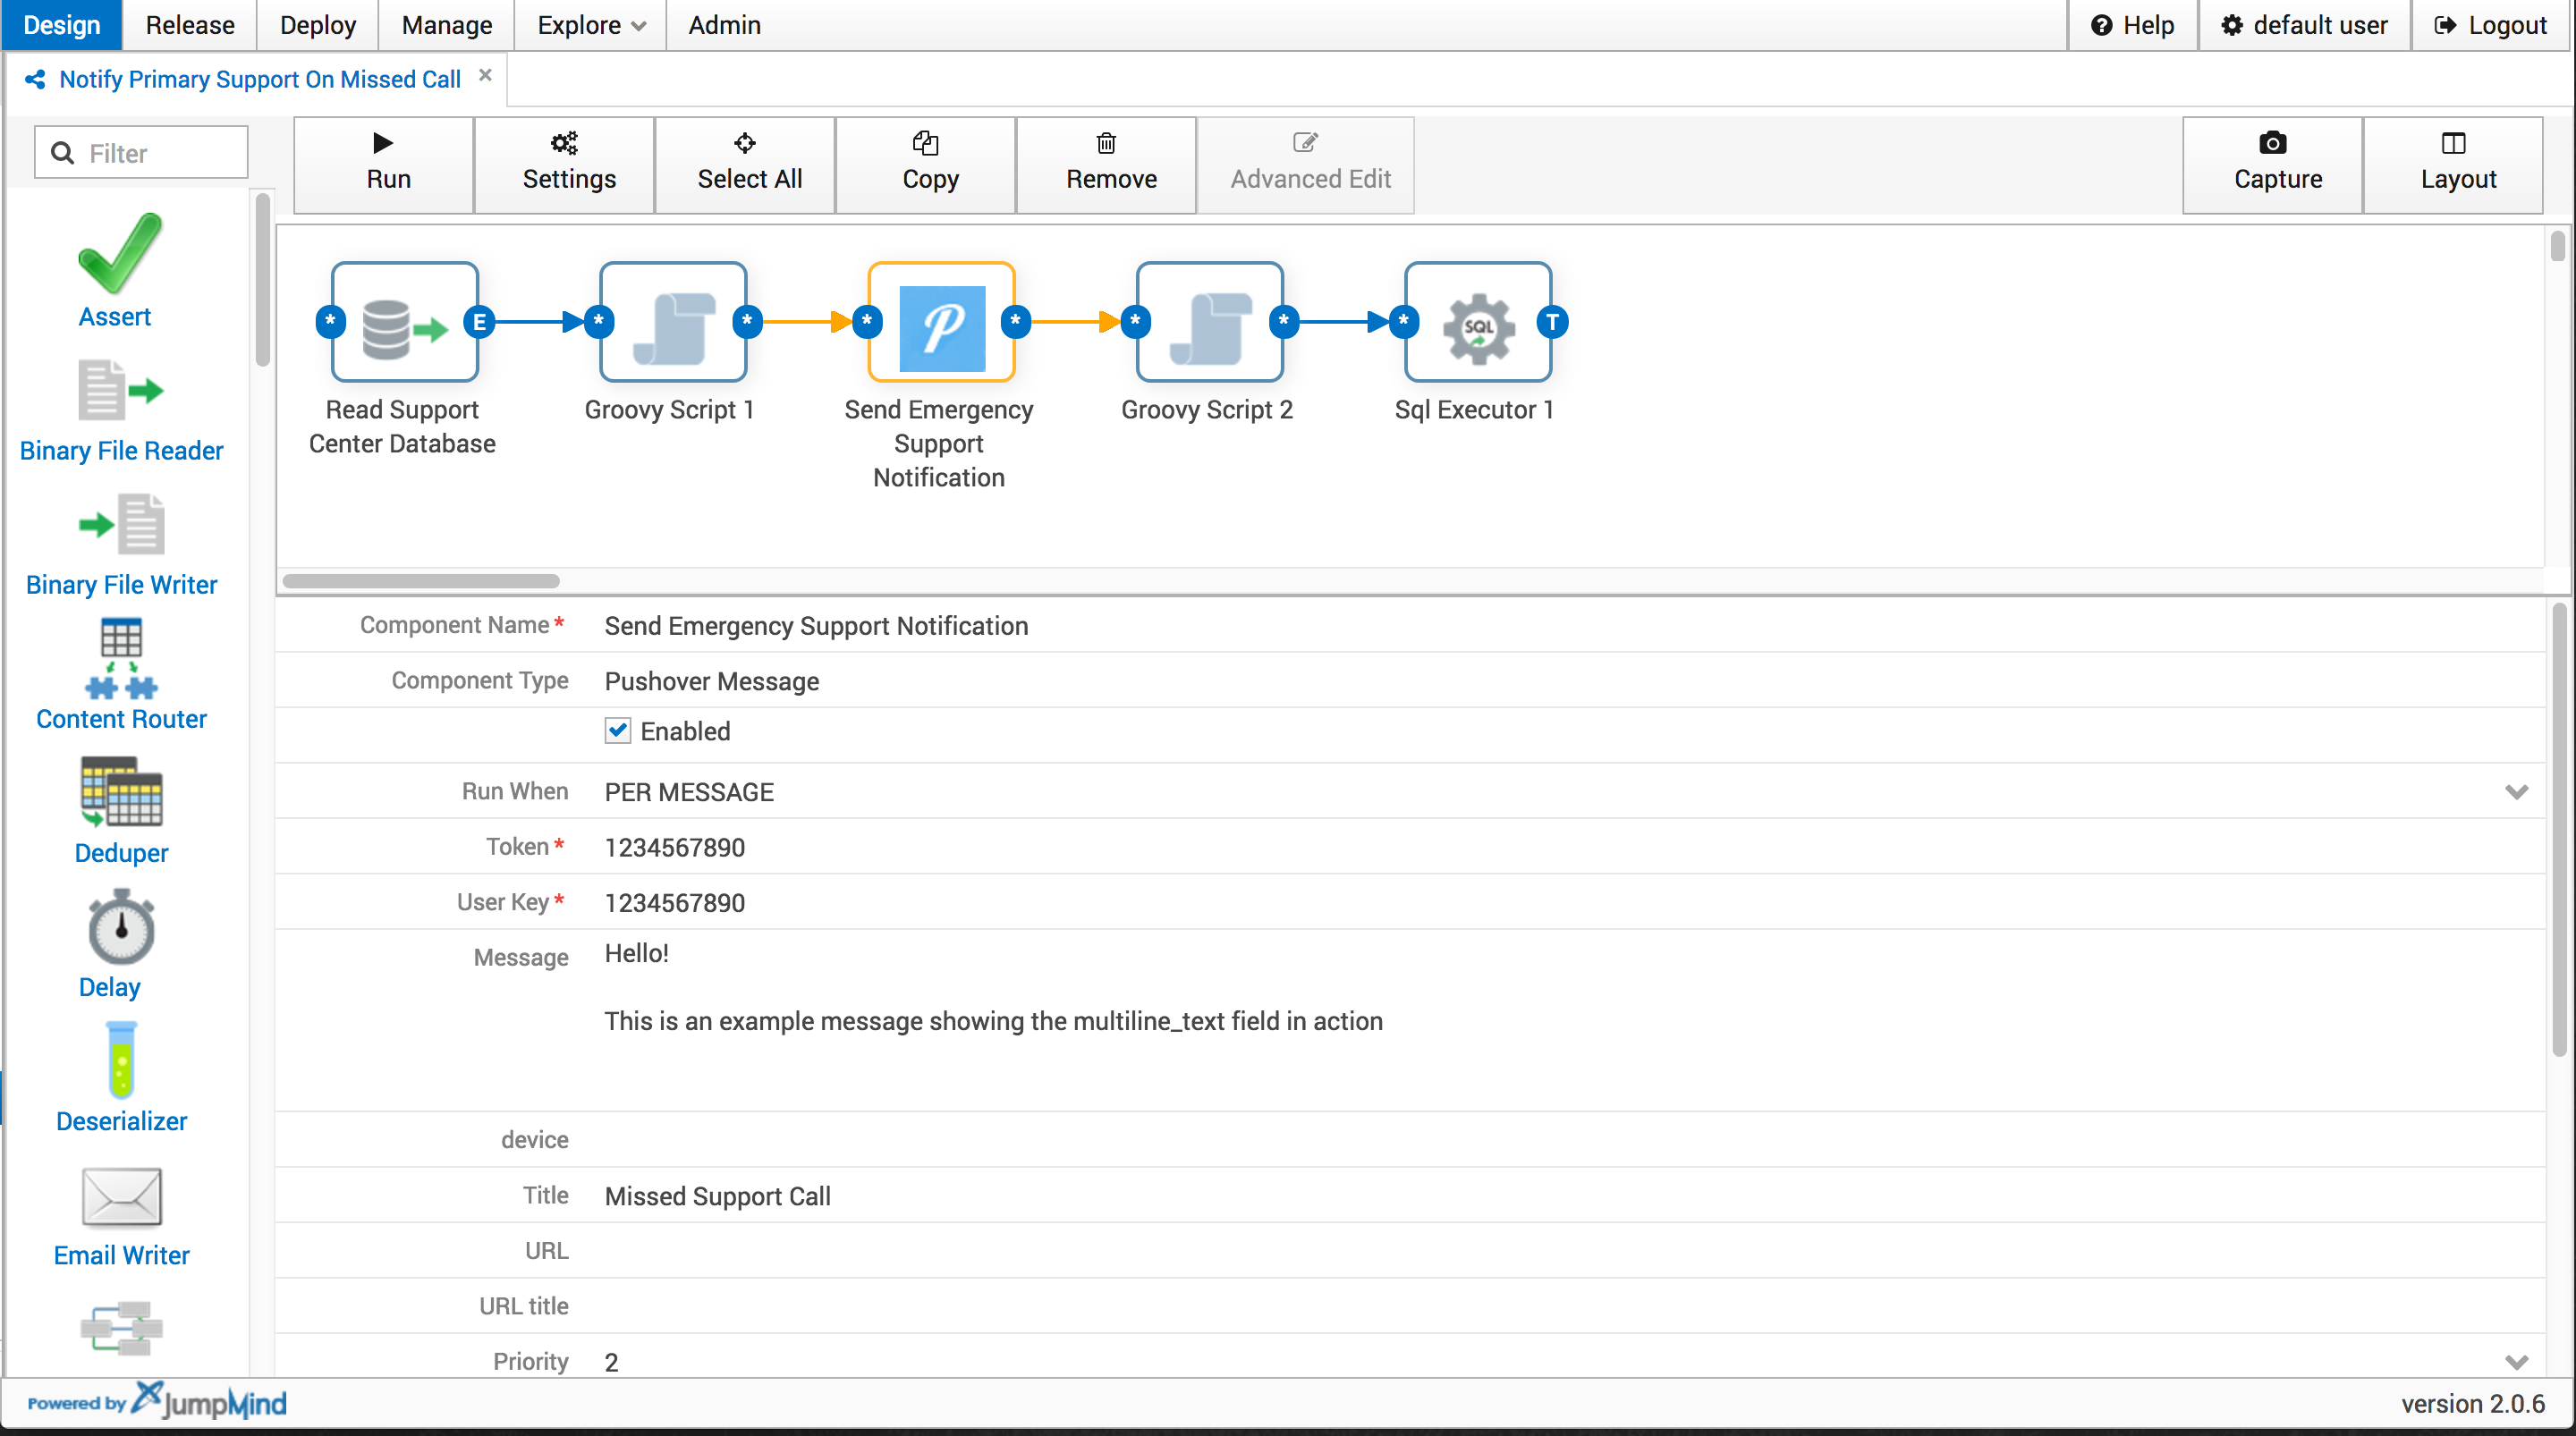
The id defines the component name. The input and output message type can be set to one of four values, one of the three message types, or any. In Metl data flows between components through a series of messages that are generated and consumed by each component. The three message types are as follows:
In this component, we chose to allow any input and output message type to keep the component generic and flexible.
Settings for the custom component are also defined in the plugin.xml file. A small sample of some of the settings configured are shown below:
<settings>
    <setting id='run.when'
               required='false'
               type='choice'>
        <name>Run When</name>
        <defaultValue>PER UNIT OF WORK</defaultValue>
        <choices>
          <choice>PER UNIT OF WORK</choice>
          <choice>PER MESSAGE</choice>
        </choices>
      </setting>
      <setting id='token'
               required='true'
               type='text'>
        <name>Token</name>
      </setting>
      <setting id='user'
               required='true'
               type='text'>
        <name>User Key</name>
      </setting>
      <setting id='message'
               required='false'
               type='multiline_text'>
        <name>Message</name>
        <defaultValue>Message</defaultValue>
      </setting>
      <setting id='device'
               required='false'
               type='text'>
        <name>device</name>
      </setting>
      <setting id='title'
               required='false'
               type='text'>
        <name>Title</name>
      </setting>
<settings>
Each setting consists of an id, required field, and a type. Initializing required to true in the plugin file will make that setting necessary to run the component. The three setting types used in this component are choice, text, and multiline_text. The type of setting will determine how said setting takes input in the Metl interface.
The choice type utilizes a drop-down menu to allow users to choose from a limited set of values defined in the plugin.xml file.
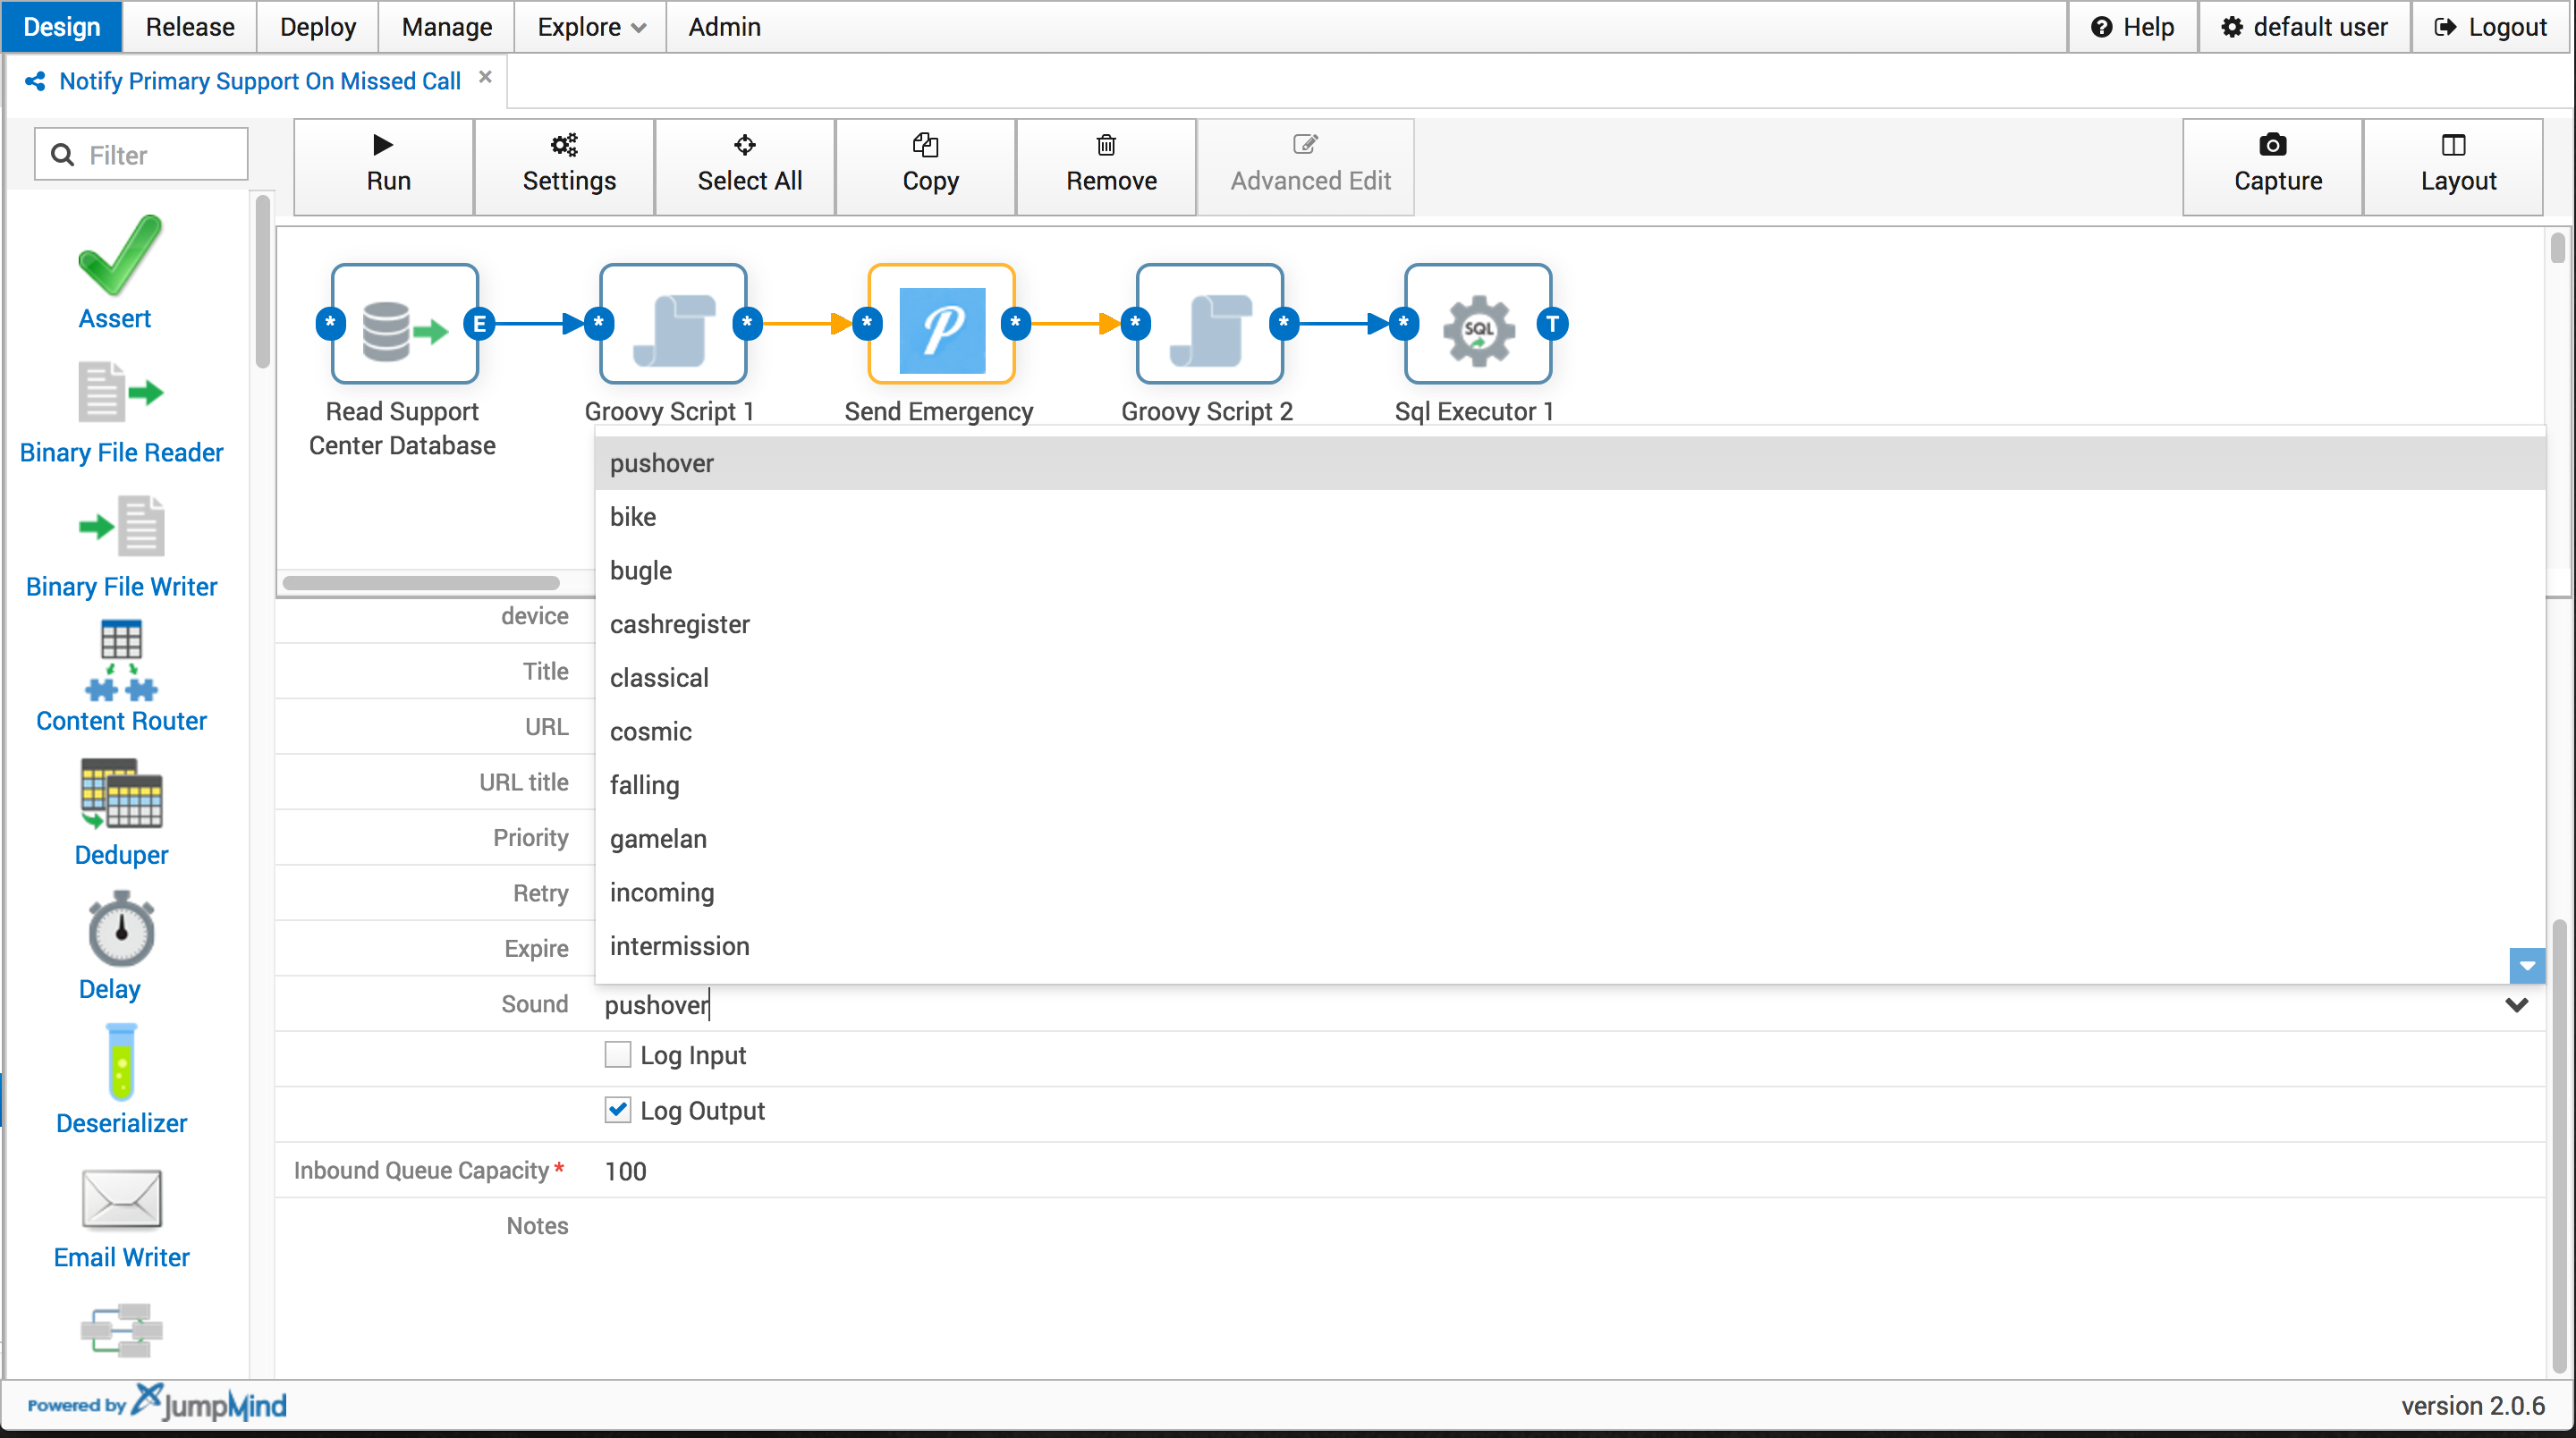
In this case the choice is for a sound chosen from a set list given by pushover to use when delivering a message.
The other two setting types used were text and multiline text. Both settings are represented in Metl by an editable text field. The choice between the two will depend on the use case.
In this component both Token and User Key are represented as text fields since they are both relatively short strings generated by Pushover. Message is a multiline text field allowing for longer inputs. The red asterisk next to a setting indicates that it is a required field.
The UI definition is created in a file called ui.xml. In this simple component, we chose to use the standard Metl component UI but a custom UI can also be created.
<ui>
    <component-ui id="Pushover Message" componentId="Pushover">
        <iconImage>org/jumpmind/metl/core/runtime/component/Pushover.png</iconImage>
    </component-ui>
<ui>
The next step in creating the component is implementing the required methods in the component’s Java class. In this example, the class implemented the IComponentRuntime and extended the AbstractComponentRuntime class.
The complete list of defined methods is available at the link above but for this simple component we only implemented two.
This start method created variables defined in the plugin.xml file and initialized them based on values input by the user in the Metl console.
@Override
    public void start() {
        Component component = getComponent();
        runWhen = properties.get(RUN_WHEN, PER_MESSAGE);
        token = component.get(TOKEN);
        user = component.get(USER);
        message = component.get(MESSAGE);
        device = component.get(DEVICE);
        title = component.get(TITLE);
        url = component.get(URL);
        urlTitle = component.get(URL_TITLE);
        priority = component.get(PRIORITY);
        if (priority.equals("2")) {
        	retry = component.get(RETRY);
        	expire = component.get(EXPIRE);
        }
        if (!priority.equals("-2") || !priority.equals("-1")){
        	sound = component.get(SOUND);
        }
    }
The next step is implementing the handle method. The handle method defines the method’s functionality and handles the different types of input messages that could be given by Metl.
@Override
	public void handle(Message inputMessage, ISendMessageCallback callback, boolean unitOfWorkBoundaryReached) {

		if (inputMessage instanceof ControlMessage && PER_UNIT_OF_WORK.equals(runWhen)) {
			if (message.isEmpty()) {
				throw new MisconfiguredException("A message must be provided for the pushover notification");
			}
			pushoverNotification();
			if (outboundPayload.size() > 0) {
				callback.sendTextMessage(inputMessage.getHeader(), outboundPayload);
			}
		} else if (inputMessage instanceof TextMessage && PER_MESSAGE.equals(runWhen)) {
			TextMessage msg = (TextMessage)inputMessage;
			if (msg.getPayload().size() > 0) {
				for (int i = 0; i < msg.getPayload().size(); i++) {
					message = msg.getPayload().get(i);
					pushoverNotification();
				}
				if (outboundPayload.size() > 0) {
					callback.sendTextMessage(inputMessage.getHeader(), outboundPayload);
				}
			}
		}
	}
For this component, we wanted the ability to send a message created or retrieved by other Metl components so we utilized the TextMessage input message type, setting the message variable created in the start method to the value of the input message if applicable.
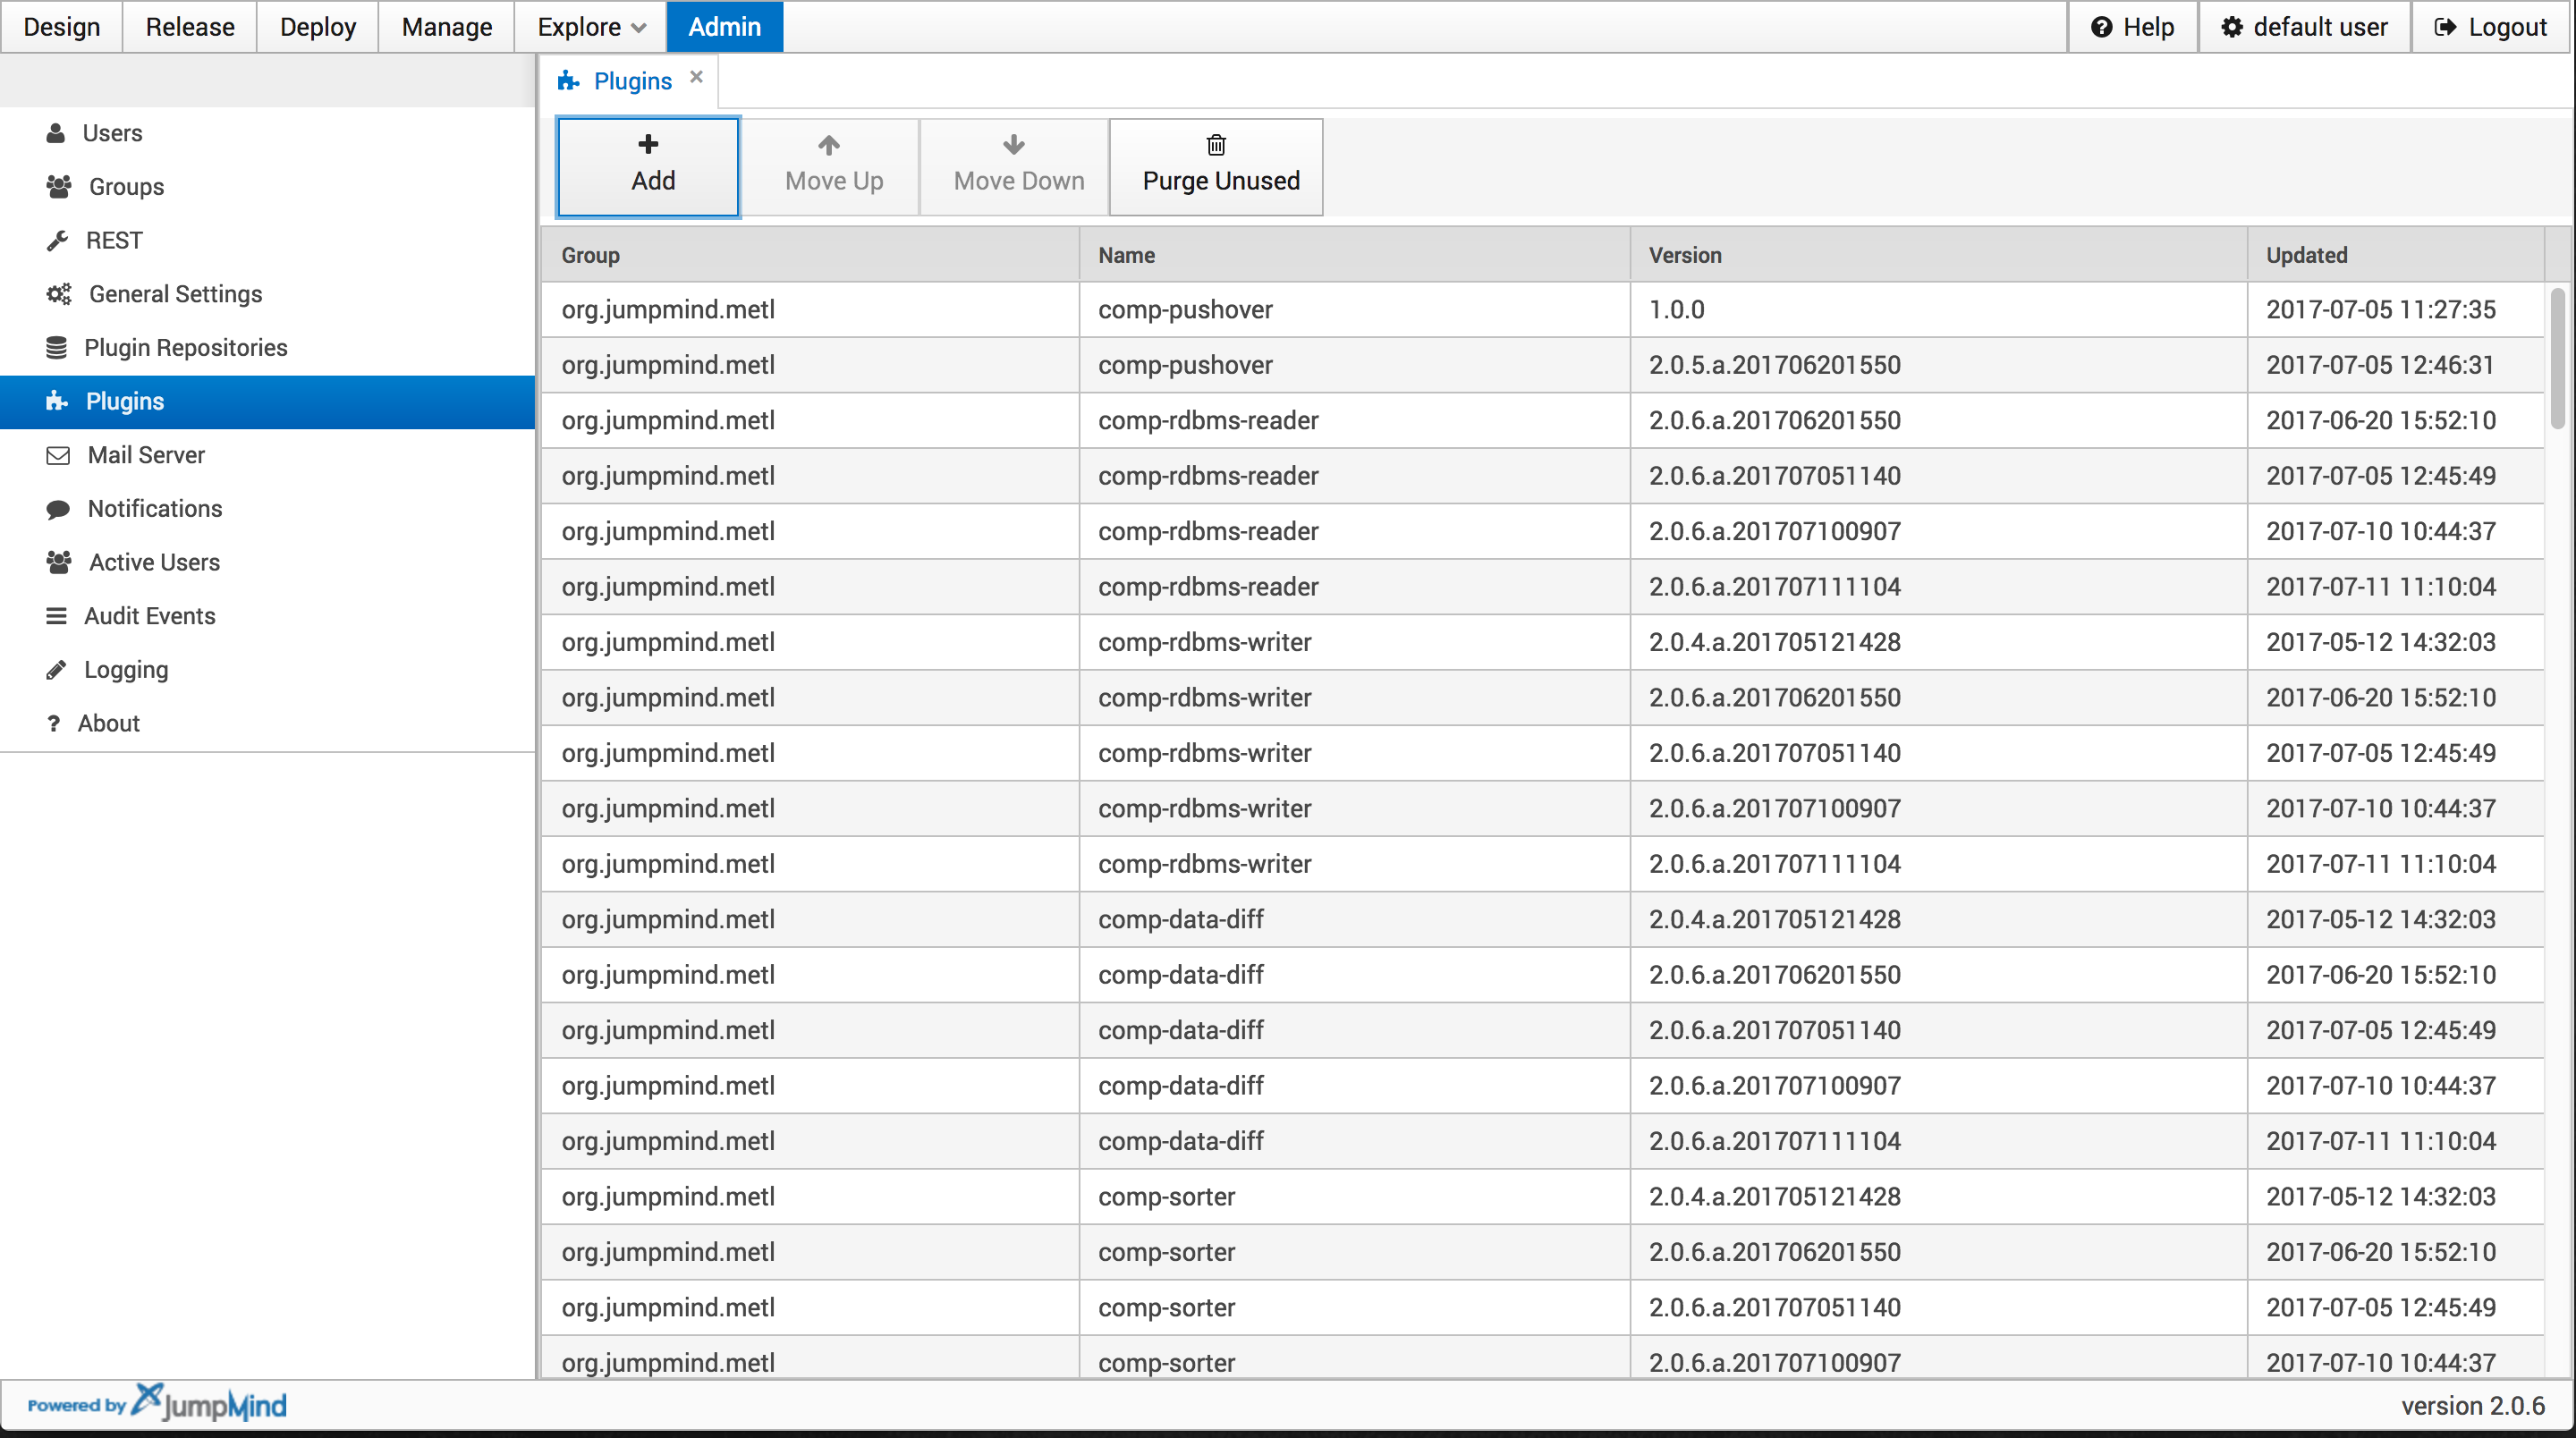
Once the component is ready for deployment it’s time to upload it to your Metl instance. Since this component was packaged into one .jar file, we will upload it directly into a running Metl instance for simplicity. To upload the component directly to the running Metl instance navigate to the Admin tab and select Plugins then click the Add button
In the popup window click on the Upload tab and fill in the required fields with the Group, Component name, and Software Version.
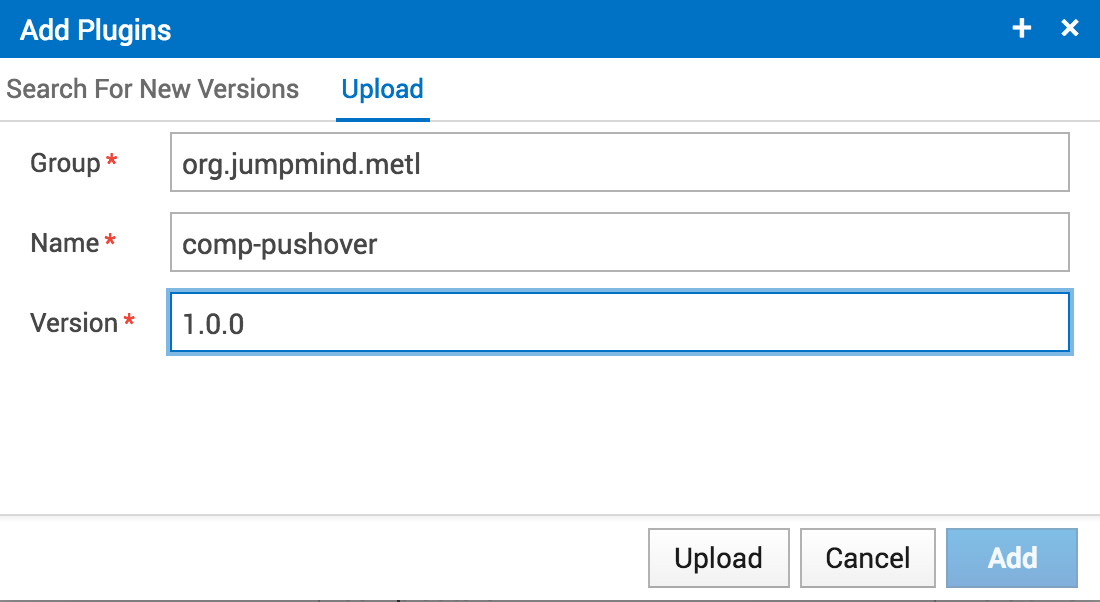
Click the upload button and navigate to the components class file. Once the class file has been uploaded, click Add to finish uploading the custom component to the Metl instance.
With your custom component now deployed in Metl, you can add it to flows and begin benefitting from its unique functionality.