Your POS system shouldn’t be an island. In today’s retail environment, your point-of-sale platform needs …

![]()
Cloud-native POS platform for seamless omnichannel customer experience.
![]()
A single hub for all promotions campaigns.
![]()
The most advanced synchronization solution for databases and file systems.
![]()
Data configuration and batch automation across different disparate systems and vendors.
Your POS system shouldn’t be an island. In today’s retail environment, your point-of-sale platform needs …

Introduction In retail, POS updates have traditionally been quarterly events at best. From October through …

Two days at ExCeL. Hundreds of vendors. Thousands of conversations. And yet, walking away from …

If you run SymmetricDS in production, you know the drill: dozens of nodes, constant data …
Overview Organizations today face the challenge of consolidating data from on-premise and cloud-based systems into …
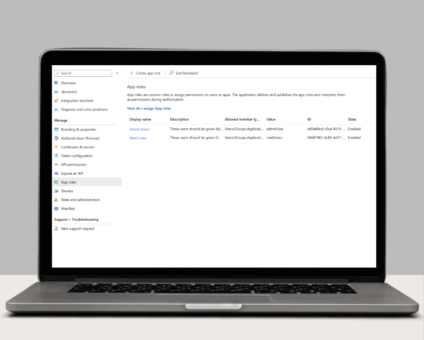
Single Sign-On with OAuth 2.0/OpenID Connect One of the many new features included in version …
Introduction In retail, POS updates have traditionally been quarterly events at best. From October through …

Jumpmind Powers Point of Sale and Promotions Execution for Landmark Retail, One of the Largest …
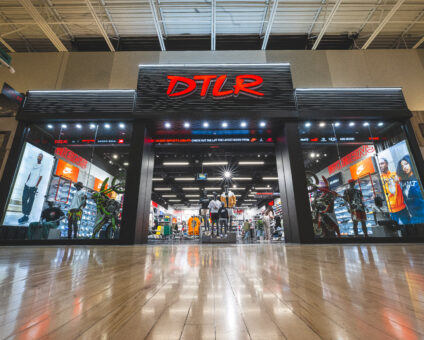
Retail Technology Leader Jumpmind to Enable Mobile Point of Sale and Inventory Management for DTLR/VILLA …

LONDON – April 21, 2026 – Jumpmind, a leading provider of innovative retail technology solutions, …

Physical retail in Europe is in a stronger position than many headlines suggest. New research …
If you run SymmetricDS in production, you know the drill: dozens of nodes, constant data …
![]()
Cloud-native POS platform for seamless omnichannel customer experience.
![]()
A single hub for all promotions campaigns.
![]()
The most advanced synchronization solution for databases and file systems.
![]()
Data configuration and batch automation across different disparate systems and vendors.
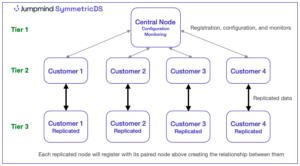
Creating a replication of hundreds or even thousands of similar databases and also being able to manage them from a central location can be a difficult task. This can be a common use case for those who create a similar database for each customer that they might support and are looking to create an active replication of this current working database. The final step is then to be able to manage all of this in a single place and that is what this blog will uncover.
Use Case
Setting up a replication of many pairs of databases that can also be managed.
Setup
To get started download and install SymmetricDS 3.14.8 or higher. The first node to setup will be the “central” or monitoring node to manage the entire sync scenario. Any database dialect can be used for this so pick one you are familiar with already. Often a new database will be created to keep this clean and separate from any other application tables.
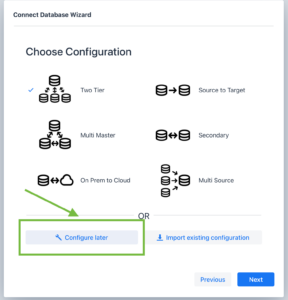
While setting this node up in SymmetricDS select the “configure later” option on the profile section to setup a custom set of groups and links.
The next step is to choose a group name, select whatever you feel appropriate like “central” and finish the node setup wizard to complete the first node installation.
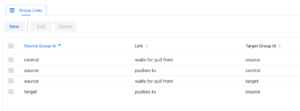
Now it is time to create two additional groups to represent the replicated nodes and also the group links to tie them all together. The two new node groups could be named anything for this demo we will use “source” and “target.” Then establish group links between all 3 of these node groups as follows.
Back on the dashboard tab use the settings gear icon in the top right to select a new dashboard layout that will be used for this use case instead. Once opened choose the preset “Monitored” and hit OK.
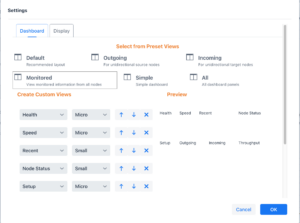
The alternate dashboard layout should look like the following once selected.
![]()
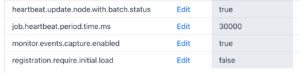
By choosing this dashboard layout several parameters were adjusted to support it.
Add A First Tier Database
It is now time to start connecting the databases and choosing tables to replicate. For security reasons, each node must register with an existing node already on the sync network. This is why the “central” node was created first above even though it is not directly connected to any application databases that will be replicated. This central node will serve as the registration node for one of the nodes/databases in each pairing. Each of these nodes can be considered part of the second tier with the central node being the first tier.
Copy the central node’s sync URL as this will be used during the connection wizard for all databases in this second tier.

While setting up any database in the second tier use the sync URL of the central node as the registration node. This will securely connect this node to the sync network and allow for the third-tier additions next.

Add A Second Tier Database
Adding more databases to the third tier of the sync network will be similar to adding those in the first tier with the exception that it will be added using a different group and also will register with the node it is paired with. For example, based on the use case picture at the beginning of the blog if Customer 1 replica is to be setup it will use a registration URL that will match the Customer 1 sync URL. This creates a relationship between these nodes and will prevent them from syncing data to other customer nodes.
Summary
Once the nodes are registered and tables have been configured for replication the setup is complete. Any issues that occur will fire an appropriate monitor which will be replicated back up to the central node for analysis. Additionally, other stats like times to purge and route as well as the last table replicated and more will also be sent up to the central over the heartbeat channel. This will provide full visibility to all databases replicating in one place.