Retailers are constantly looking for new ways to generate revenue and stay competitive. One strategy …
Synchronizing uniCenta oPOS
SymmetricDS is flexible enough to be used in a variety of situations, one of which being retail. UniCenta is an open-sourced POS system that is used all across the globe. Synchronization of uniCenta oPOS and SymmetricDS is not only fully supported, but it is also quite simple.
One of the great things about SymmetricDS is that it can support virtually any number of nodes you need. In this example, however, we will only use two, a corporate and a store node.
In this example, SymmetricDS Pro 3.6.0, uniCenta oPOS 3.56, MySQL 5.6.19, and MySQL Workbench 6.1.6 were used.
Let’s get started. The first step is opening your MySQL Workbench. Create a new connection. You can do this by clicking the plus (+) next to MySQL Connections. Put in the requested information and click OK. Open your newly created connection.
On the bottom left, under Schemas, right-click->Create Schema. Name it store1 and click apply. Create another schema, but this time, name it corporate.
Open up your uniCentaopos.jar file. Sign in as an Administrator and expand the toolbar and navigate to System->Configuration. Under the Database Setup tab, enter the information for your database. In the URL, replace the hostname with your hostname and port, followed by a /store1. If you set up a User and Password, enter it now. Save the changes, and restart uniCenta.
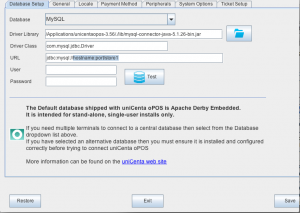
uniCenta Database Configuration
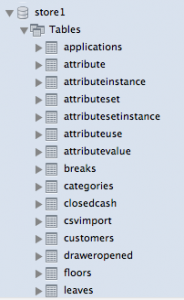
If everything went smoothly, you should now be able to see uniCenta’s tables inside of your store1 schema. Do this by refreshing (right-click, Refresh All) and expanding the store1 schema in MySQL Workbench. After expanding the Tables tab, you should see it is now populated with tables from uniCenta.
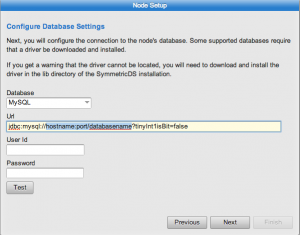
In order to integrate uniCenta and SymmetricDS we must install SymmetricDS for both store1 and corporate. SymmetricDS easily supports multiple installations. Simply run the installer twice, each time naming one version with a -Corporate and one with a -Store1. IMPORTANT: Make sure on the Service Port Setup, you give unique ports between the two installations for all three options. Now that you have both of your installations, start the SymmetricDS-Corporate server and open the web console. Create a new Master Node. Set your Database as MySQL. Under the URL, edit the “hostname”, and replace “databasename” with corporate. If you created a User ID and Password, enter those fields and click next.
Say that you will configure things yourself. When asked for a group, type “corporate”. Name the External Id as “corporate”.
Now that we’re inside, lets set up our Groups and Group Links. These can be found under the Configure tab. Click Groups and create a new Group called “store”. Click Group Links and create a link for corporate to store as well as store to corporate. Set up routers for both of these.
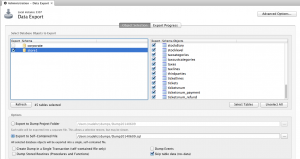
In order for the synchronization to work, we must create the tables in the corporate node. To do this, go back to your MySQL Workbench. Under Management, click Data Export. Select the store1 schema and check all of the tables. Choose Export to Self-Contained File. Make sure to check the box that says Skip table data (no-data). Start the export.
Once finished, navigate to the file and open it up with a text editor. Copy all the text except the top couple lines. Go back to your SymmetricDS corporate web console. Click Explore and paste, running as a script. To double-check that the tables were created, go back to your MySQL Workbench and Refresh All. Expand the corporate schema and expand Tables. Your newly created tables should be there.
It is now time to set up your triggers. For the purpose of this example, we will set up Table Triggers for all of our tables routed both ways.
It is now time to set up your store1 SymmetricDS installation. Create a new Node. Set your Database as MySQL. Under the URL, edit the “hostname”, and replace “databasename” with store1. If you created a User ID and Password, enter those fields and click next. When asked for a group, enter “store”. When asked for a Registration URL, enter the corporate’s sync url. Enter “store1” as the External Id.
Go back to the corporate SymmetricDS web console. Go to Manage->Nodes. Right-click and allow the registration.
Additional Tips
If desired, it is simple to create even more store nodes. Simply repeat the above steps to accomplish this.
A unique feature with SymmetricDS is the ability to see which node sent which data through the use of Transforms. An example of this would be to see which store created what receipt. To do this, first we have to add the column to the receipts table. Go to Explore and run the following code:
ALTER TABLE RECEIPTS ADD STORE_ID VARCHAR(255)
Next, go to Configure->Transforms. Chose the “store pushes to corporate” group link. Select the receipt table and click apply. Double-click the transform and click the plus (+) button in the top left of the pop-up window. Leave the source blank and choose STORE_ID as the target. Change the type to a variable and select source_node_id. Apply and save your changes.
Congratulations! Your corporate and store nodes should now be synchronized through SymmetricDS using uniCenta. Any changes you make in uniCenta (ie. adding a customer, adding a product, making a sale…) should now synchronize to your SymmetricDS corporate database.


